Autor-Archiv Tobias Stephan

VonTobias Stephan

Modifier et adapter la ligne d’assistance de Shopware Servcie

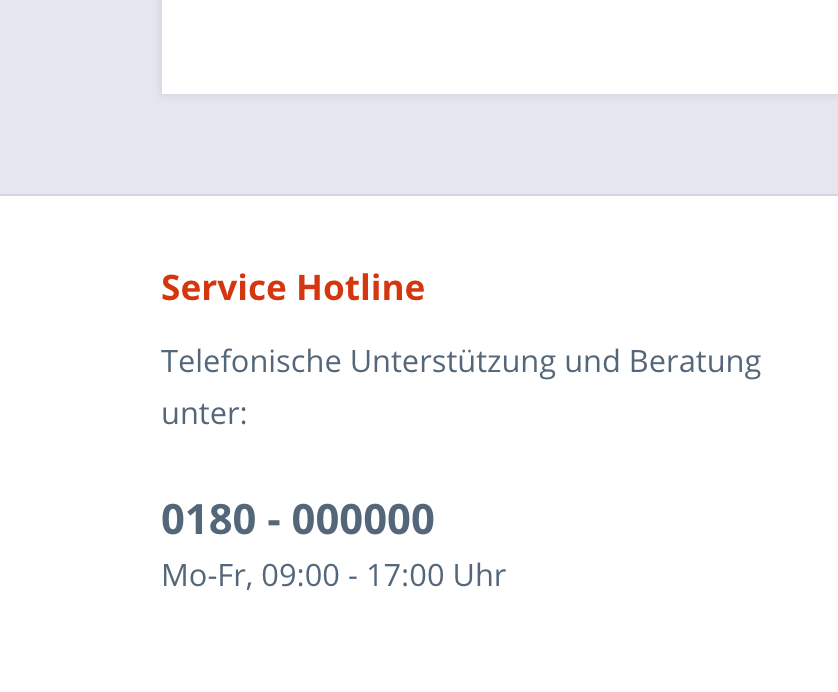
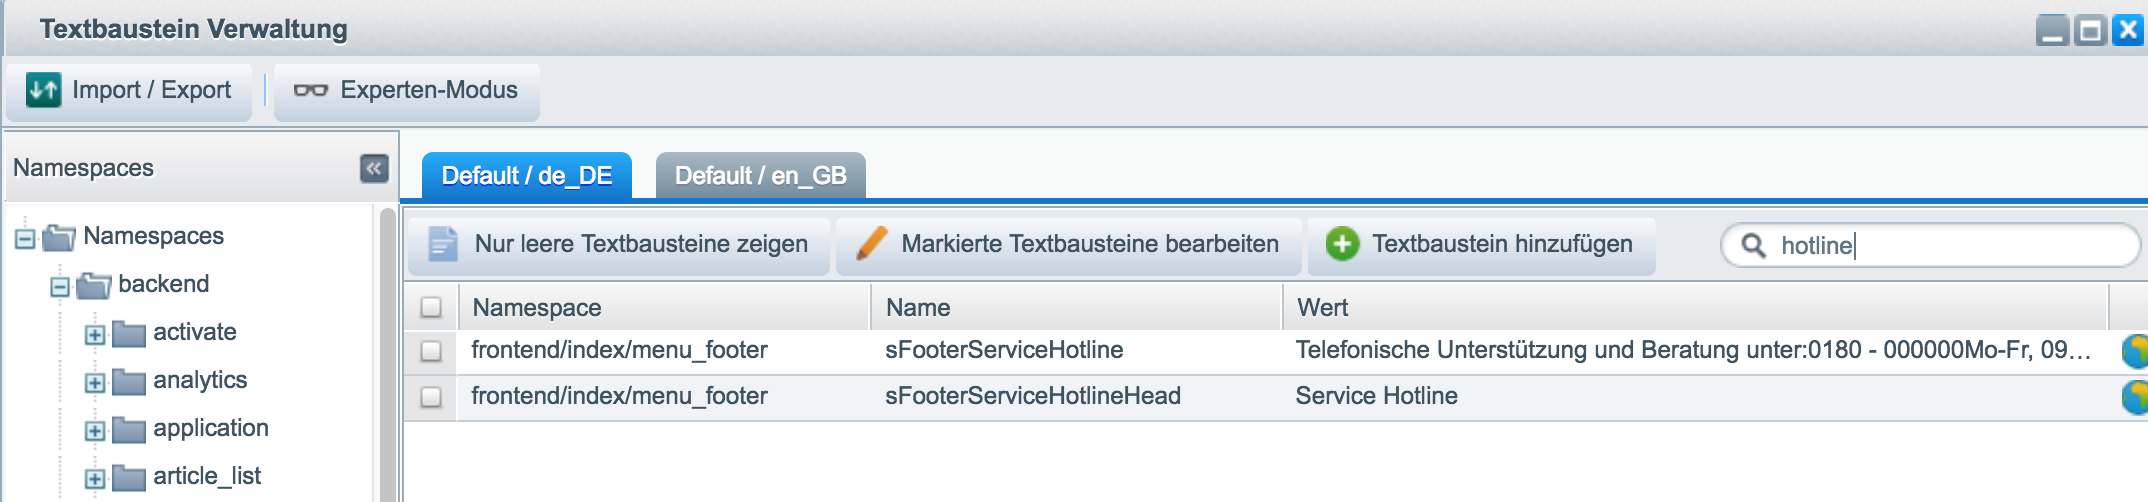
Les informations de la ligne d’assistance téléphonique sont un module de texte. Les modules de texte peuvent être modifiés facilement via „Paramètres – Modules de texte“.
Pour éviter de devoir chercher éternellement le bon module de texte, il est recommandé de saisir simplement le mot „Hotline“ dans le champ de recherche.

VonTobias Stephan

Amazon account locked hotline

Here is the link to the contact form

If you can no longer log in as a seller, on Amazon as a seller has a real problem. This has also happened to me, for me it was a new credit card – it was not possible to click on the seller service and the entry of the new credit card number was not successful. „You look stupid out of the laundry!“ – I just found a fresh link in Sellercentral more by chance and hope to help colleagues with it. It’s not a phone number, but it’s a form that you can contact.

Kontakt zum Amazon Verkäuferservice, wenn sonst mal nichts mehr geht
VonTobias Stephan

Amazon trotz Kontensperre Kontakt zum Verkäuferservice

Hier der Link zum Formular

Wenn man sich als Verkäufer nicht mehr anmelden kann, hat ,am als Verkäufer bei Amazon ein echtes Problem. Auch mir ist das schon passiert, bei mir war es eine neue Kreditkarte – ein Klicken auf den Verkäuferservice war nicht möglich und die Eingabe der neuen Kreditkartennummer war nicht erfolgreiche. „Da schaut man dumm aus der Wäsche!“ – Soeben habe ich im Sellercentral mehr zufällig einen frischen Link entdeckt und hoffe Kollegen damit helfen zu können. Es ist zwar keine Telefonnummer, aber immerhin ein Formular, mit dem man Kontakt aufnehmen kann. Selber

Kontakt zum Amazon Verkäuferservice, wenn sonst mal nichts mehr geht
VonTobias Stephan

SwiftUI菜单按钮示例汉堡菜单

给你的。这里有一个Swift UI汉堡包菜单的现成示例。你可以通过滑动或点击汉堡包符号来轻松隐藏菜单。只需在默认设置下创建一个新的SwiftUI项目作为一个单一的应用程序即可。简单的复制和粘贴一切,玩转项目。

//
//  ContentView.swift
//  SlideMenuSwiftSample
//
//  Created by T. Stephan on 03.05.20.
//  Copyright © 2020 eCommerce - Tobias Stephan. All rights reserved.
//

import SwiftUI

struct ContentView: View {
    @State var showHamburgerMenu = false
    
    
    var body: some View {
        
        
        let drag = DragGesture()
            .onEnded {
                if $0.translation.width < -100 {
                    withAnimation {
                        self.showHamburgerMenu = false
                    }
                }
        }
        
        return NavigationView {
            GeometryReader { geometry in
                ZStack(alignment: .leading) {
                    MainView(showHamburgerMenu: self.$showHamburgerMenu)
                        .frame(width: geometry.size.width, height: geometry.size.height)
                        .offset(x: self.showHamburgerMenu ? geometry.size.width/2 : 0)
                        .disabled(self.showHamburgerMenu ? true : false)
                    
                    if self.showHamburgerMenu {
                        MenuView()
                            .frame(width: geometry.size.width/2)
                            .transition(.move(edge: .leading))
                    }
                }
                .gesture(drag)
                
            }
            .navigationBarTitle("Side Menu", displayMode: .inline)
            .navigationBarItems(leading: (
                Button(action: {
                    withAnimation {
                        self.showHamburgerMenu.toggle()
                    }
                }) {
                    Image(systemName: "line.horizontal.3")
                        .imageScale(.large)
                }
            ))
        }
        
    }
}

struct MainView: View {
    @Binding var showHamburgerMenu: Bool
    
    var body: some View {
        Button(action: {
            withAnimation {
                self.showHamburgerMenu = true
            }
        }) {
            Text("Show Menu")
        }
    }
}

struct MenuView: View {
    var body: some View {
        VStack(alignment: .leading) {
            HStack {
                Image(systemName: "person")
                    .foregroundColor(.gray)
                    .imageScale(.large)
                NavigationLink(destination: ProfileView()) {
                    Text("Profile")
                        .foregroundColor(.gray)
                        .font(.headline)
                }
            }
            .padding(.top, 100)
            HStack {
                Image(systemName: "envelope")
                    .foregroundColor(.gray)
                    .imageScale(.large)
                NavigationLink(destination: MessagesView()) {
                    Text("Messages")
                        .foregroundColor(.gray)
                        .font(.headline)
                }
            }
            .padding(.top, 30)
            HStack {
                Image(systemName: "gear")
                    .foregroundColor(.gray)
                    .imageScale(.large)
                NavigationLink(destination: SettingsView()) {
                    Text("Settings")
                        .foregroundColor(.gray)
                        .font(.headline)
                }
            }
            .padding(.top, 30)
            Spacer()
        }
        .padding()
        .frame(maxWidth: .infinity, alignment: .leading)
        .background(Color(red: 32/255, green: 32/255, blue: 32/255))
        .edgesIgnoringSafeArea(.all)
    }
}

struct SettingsView: View {
    var body: some View {
        VStack{
            Text("Settings Subview")
        }
    }
}
struct MessagesView: View {
    var body: some View {
        VStack{
            Text("Messages Subview")
        }
    }
}
struct ProfileView: View {
    var body: some View {
        VStack{
            Text("Profile Subview")
        }
    }
}

struct ContentView_Previews: PreviewProvider {
    static var previews: some View {
        ContentView()
    }
}

VonTobias Stephan

SwiftUI Menue Button example Hamburger Menu

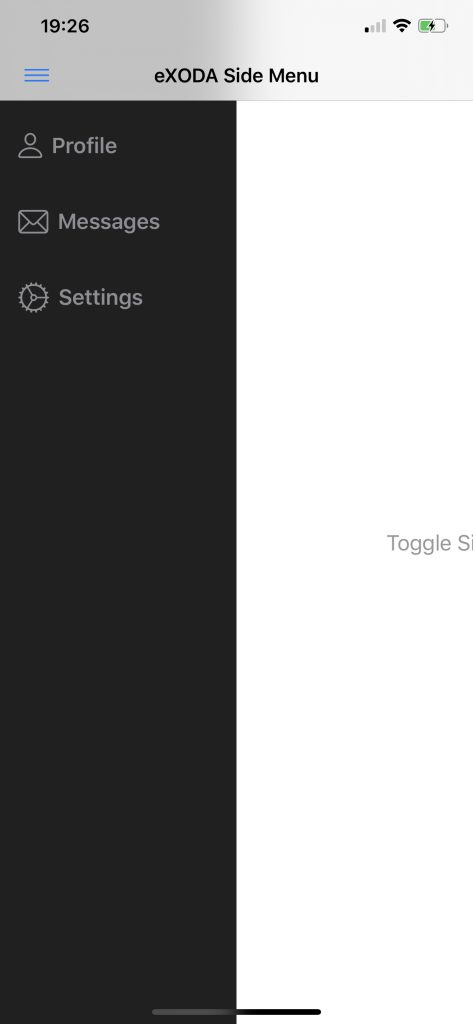
Here you go. Here you have a ready sample for a Swift UI hamburger menu. You can easily hide the menu with a slide or tap on the hamburger symbol. Simply create a new SwiftUI project as a single app with the default settings. Simply copy and paste everything and play around with the project.

//
//  ContentView.swift
//  SlideMenuSwiftSample
//
//  Created by T. Stephan on 03.05.20.
//  Copyright © 2020 eCommerce - Tobias Stephan. All rights reserved.
//

import SwiftUI

struct ContentView: View {
    @State var showHamburgerMenu = false
    
    
    var body: some View {
        
        
        let drag = DragGesture()
            .onEnded {
                if $0.translation.width < -100 {
                    withAnimation {
                        self.showHamburgerMenu = false
                    }
                }
        }
        
        return NavigationView {
            GeometryReader { geometry in
                ZStack(alignment: .leading) {
                    MainView(showHamburgerMenu: self.$showHamburgerMenu)
                        .frame(width: geometry.size.width, height: geometry.size.height)
                        .offset(x: self.showHamburgerMenu ? geometry.size.width/2 : 0)
                        .disabled(self.showHamburgerMenu ? true : false)
                    
                    if self.showHamburgerMenu {
                        MenuView()
                            .frame(width: geometry.size.width/2)
                            .transition(.move(edge: .leading))
                    }
                }
                .gesture(drag)
                
            }
            .navigationBarTitle("Side Menu", displayMode: .inline)
            .navigationBarItems(leading: (
                Button(action: {
                    withAnimation {
                        self.showHamburgerMenu.toggle()
                    }
                }) {
                    Image(systemName: "line.horizontal.3")
                        .imageScale(.large)
                }
            ))
        }
        
    }
}

struct MainView: View {
    @Binding var showHamburgerMenu: Bool
    
    var body: some View {
        Button(action: {
            withAnimation {
                self.showHamburgerMenu = true
            }
        }) {
            Text("Show Menu")
        }
    }
}

struct MenuView: View {
    var body: some View {
        VStack(alignment: .leading) {
            HStack {
                Image(systemName: "person")
                    .foregroundColor(.gray)
                    .imageScale(.large)
                NavigationLink(destination: ProfileView()) {
                    Text("Profile")
                        .foregroundColor(.gray)
                        .font(.headline)
                }
            }
            .padding(.top, 100)
            HStack {
                Image(systemName: "envelope")
                    .foregroundColor(.gray)
                    .imageScale(.large)
                NavigationLink(destination: MessagesView()) {
                    Text("Messages")
                        .foregroundColor(.gray)
                        .font(.headline)
                }
            }
            .padding(.top, 30)
            HStack {
                Image(systemName: "gear")
                    .foregroundColor(.gray)
                    .imageScale(.large)
                NavigationLink(destination: SettingsView()) {
                    Text("Settings")
                        .foregroundColor(.gray)
                        .font(.headline)
                }
            }
            .padding(.top, 30)
            Spacer()
        }
        .padding()
        .frame(maxWidth: .infinity, alignment: .leading)
        .background(Color(red: 32/255, green: 32/255, blue: 32/255))
        .edgesIgnoringSafeArea(.all)
    }
}

struct SettingsView: View {
    var body: some View {
        VStack{
            Text("Settings Subview")
        }
    }
}
struct MessagesView: View {
    var body: some View {
        VStack{
            Text("Messages Subview")
        }
    }
}
struct ProfileView: View {
    var body: some View {
        VStack{
            Text("Profile Subview")
        }
    }
}

struct ContentView_Previews: PreviewProvider {
    static var previews: some View {
        ContentView()
    }
}

VonTobias Stephan

SwiftUI Menue Button example Hamburger Menü

Bitteschön. Hier hast Du ein fertiges Sample für ein Swift UI Hamburger Menü. Das Menü lässt sich bequem mit per Slide ausblenden oder durch Tap auf das Hamburger Symbol einblenden. Lege einfach ein neues SwiftUI Projekt als Single App mit den Standardeinstellungen an. Übernimm alles einfach per Copy Paste und spiele am Projekt rum.

//
//  ContentView.swift
//  SlideMenuSwiftSample
//
//  Created by T. Stephan on 03.05.20.
//  Copyright © 2020 eCommerce - Tobias Stephan. All rights reserved.
//

import SwiftUI

struct ContentView: View {
    @State var showHamburgerMenu = false
    
    
    var body: some View {
        
        
        let drag = DragGesture()
            .onEnded {
                if $0.translation.width < -100 {
                    withAnimation {
                        self.showHamburgerMenu = false
                    }
                }
        }
        
        return NavigationView {
            GeometryReader { geometry in
                ZStack(alignment: .leading) {
                    MainView(showHamburgerMenu: self.$showHamburgerMenu)
                        .frame(width: geometry.size.width, height: geometry.size.height)
                        .offset(x: self.showHamburgerMenu ? geometry.size.width/2 : 0)
                        .disabled(self.showHamburgerMenu ? true : false)
                    
                    if self.showHamburgerMenu {
                        MenuView()
                            .frame(width: geometry.size.width/2)
                            .transition(.move(edge: .leading))
                    }
                }
                .gesture(drag)
                
            }
            .navigationBarTitle("Side Menu", displayMode: .inline)
            .navigationBarItems(leading: (
                Button(action: {
                    withAnimation {
                        self.showHamburgerMenu.toggle()
                    }
                }) {
                    Image(systemName: "line.horizontal.3")
                        .imageScale(.large)
                }
            ))
        }
        
    }
}

struct MainView: View {
    @Binding var showHamburgerMenu: Bool
    
    var body: some View {
        Button(action: {
            withAnimation {
                self.showHamburgerMenu = true
            }
        }) {
            Text("Show Menu")
        }
    }
}

struct MenuView: View {
    var body: some View {
        VStack(alignment: .leading) {
            HStack {
                Image(systemName: "person")
                    .foregroundColor(.gray)
                    .imageScale(.large)
                NavigationLink(destination: ProfileView()) {
                    Text("Profile")
                        .foregroundColor(.gray)
                        .font(.headline)
                }
            }
            .padding(.top, 100)
            HStack {
                Image(systemName: "envelope")
                    .foregroundColor(.gray)
                    .imageScale(.large)
                NavigationLink(destination: MessagesView()) {
                    Text("Messages")
                        .foregroundColor(.gray)
                        .font(.headline)
                }
            }
            .padding(.top, 30)
            HStack {
                Image(systemName: "gear")
                    .foregroundColor(.gray)
                    .imageScale(.large)
                NavigationLink(destination: SettingsView()) {
                    Text("Settings")
                        .foregroundColor(.gray)
                        .font(.headline)
                }
            }
            .padding(.top, 30)
            Spacer()
        }
        .padding()
        .frame(maxWidth: .infinity, alignment: .leading)
        .background(Color(red: 32/255, green: 32/255, blue: 32/255))
        .edgesIgnoringSafeArea(.all)
    }
}

struct SettingsView: View {
    var body: some View {
        VStack{
            Text("Settings Subview")
        }
    }
}
struct MessagesView: View {
    var body: some View {
        VStack{
            Text("Messages Subview")
        }
    }
}
struct ProfileView: View {
    var body: some View {
        VStack{
            Text("Profile Subview")
        }
    }
}

struct ContentView_Previews: PreviewProvider {
    static var previews: some View {
        ContentView()
    }
}

VonTobias Stephan

Dremel 3D45 3D40アプリソフト用カムビューア

このアプリでは、最大3台のDremel 3D45または3D40 Idea Builder 3Dプリンターをモニターすることができます。ご存知の通り、Dremel 3D45には、Dremel 3D40のアイデアビルダーとは違い、カメラが付いています。前述のDremelの3dプリンタのためのこのアプリを使用すると、両方のデバイスタイプのステータスを監視することができます。

新しいバージョン1.17は、2020年5月02日から。
ドレメルプリンターのアプリが完全に5ヶ国語に翻訳されました。また、プリンターから届いたフィードバックも翻訳されています。このアプリは英語、ドイツ語、フランス語、イタリア語、中国語、日本語、ロシア語に対応しています。

Apple App Storeでダウンロード

2020年4月23日付けの新バージョン1.14
IOSバージョン13.4.1にアップデートした後、一部のユーザーのためにアプリがクラッシュする原因となりました。このバージョンで問題は解決しました。

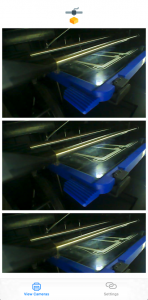
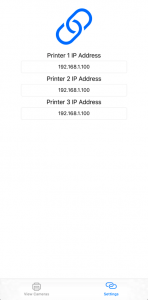
このアプリを使用すると、3Dオブジェクトを作成する3D45 / 3D40プリンタを3つまで見ることができます。さらに、対象物が終了するまでの時間計算や、印刷をキャンセルする可能性があるなど、細かなステータスメッセージもあります。特に、印刷中に問題がないかどうかを一目で確認したい場合に便利です。時間を介在させて、完璧な形で対象物を世界に引き入れることができるという利点があります。設定の下に端末の内部IPアドレスを入力するだけで準備完了です。Dremel 3D45 の設定を使用して、ローカル IP アドレスを設定したり、自動的に割り当てられた V4 IP アドレスを使用したりすることができます。お使いの Dremel 3D45 の IP アドレスは、設定で確認できます。ステータス表示には、進行状況、ノズル温度、時間、ドアの開閉、プラットフォーム温度、チャンバ温度、印刷ファイル名、ファイルタイプに関する情報が表示されます。

オブジェクトの完了予定時間、パーセント単位のプログレスバー、ノズルの現在の温度など、現在のステータス情報。扉や蓋が閉まっていませんか?アプリはそれを表示します。チャンバーやプラットフォームの温度、このアプリであなたは最新の状態になります。キャンセルボタンをクリックすることで、アプリから直接印刷をキャンセルすることができるようになりました。

Dremel 3D45のアプリ – お手持ちの3Dプリンターのステータスとコントロール!

VonTobias Stephan

Dremel 3D45 3D40 APP软件的凸轮查看器

通过此应用,您可以监控多达3台Dremel 3D45或3D40 Idea Builder 3D打印机。众所周知,Dremel 3D45有摄像头,与Dremel 3D40 Idea Builder不同的是,Dremel 3D45有摄像头。通过这款适用于上述Dremel 3D打印机的应用程序,您可以监控这两种设备类型的状态。

新版本1.17,从2020年5月2日开始。
现在,Dremel打印机的APP已经完全翻译成5种语言。同时,打印机送来的反馈也被翻译了出来。该应用有英文、德文、法文和意大利文、中文、日文和俄文四种语言。

下载苹果商店

2020年4月23日的新版本1.14。
更新到IOS版本13.4.1后,导致部分用户的应用崩溃。这个版本的问题就解决了。

通过这个应用程序,您可以观看多达3台Dremel 3D45 / 3D40打印机创建3D对象。此外,还有详细的状态信息,比如在打印对象完成之前的时间计算,或者是取消打印的可能性。如果您想在打印过程中一目了然地检查是否一切正常,这一点特别有用。这样做的好处是,可以及时介入,将物体完美的融入到这个世界中。只需在设置下输入设备的内部IP地址就可以了。使用 Dremel 3D45 上的设置,您可以设置一个本地 IP 地址或使用自动分配的 V4 IP 地址。您可以在设置中找到Dremel 3D45的IP地址。状态显示包含了进度、喷嘴温度、时间、打开或关闭门、平台温度、腔体温度、打印文件名称和文件类型等信息。

当前状态信息,如对象的预期完成时间,以及进度条,单位为百分比或喷嘴的当前温度。门或盖子是关上了吗?该应用显示它。腔体或平台的温度,有了这个APP,你的温度是最新的。现在,您可以通过点击取消按钮直接从应用程序中取消打印。

适用于Dremel 3D45的应用程序–状态和控制您的3D打印机!

VonTobias Stephan

Listory generates lists

Lists created with Listory are especially easy to share with others. You can work on the list simultaneously with several people. Imagine going shopping with your family. 4 people start to collect the things in the supermarket that are on the list. If you click on done…the item will disappear for you and the other users. But the entry reappears! That is the special thing about it! So your lists are reusable. This is a decisive advantage.

You can use the Listory Lister from eXODA for your daily tasks. That can also be shopping. Here Listory even has a special function. Listory can scan and store photos. If you take a photo of a product, others who have access to the lists will see how the product looks like.

What do I need the app for?
The App, which is currently only available for IOS, i.e. Apple devices, has a lot more functions. The App is available in a free and a paid version.

What about data protection?
Listory works just like that, without registration. How does that work? Listory Lister generates a unique token (key) the first time you use it. Whoever has the key has access! The key is in the link. So you should secure the link well. But we don’t know who you are and don’t want to know. Your data belongs to you!

Are cookies used?
Yes, but only for the basic function. Listory Lister recognizes that you have been there before and receives the key immediately. More cookies are not stored.

Schon Listory.net gecheckt?


Listory is the tool without account registration for quick listings. Tasks? Shopping list? …whatever, Listory helps you quickly and free of charge.

VonTobias Stephan

In App Käufe unter IOS realisieren

Dieser Beitrag gilt nur den kleinen Fallstricken. Apple prüft sehr genau und das ist ja auch sinnvoll. Die App selber muss zur Prüfung mit dem In App Kauf eingereicht werden. Du legst also vor einen In App Kauf fest. Der Zugriff auf die Daten des In App Kaufs ist erst nach Freigabe durch Apple möglich. Deshalb ist es sinnvoll die Prüfvorgang leicht und eindeutig für Apple zu gestalten.

Hier die Reihenfolge, in der ich vorgehe.
Wir gehen davon aus, dass die App bereits existiert und nun durch In-Kauf-Möglichkeiten ergänzt wird.

  • zuerst definiere ich die eigenen Termins of Use in den App Informationen (mehr dazu weiter unten)
  • dann Anlegen des ersten In-App-Kaufs
  • Lokalisierung bei der Abo-Gruppe nicht vergessen, sonst erscheint immer „Fehlende Metadaten“

Unter Features kannst Du einen neuen In-App-Kauf anlegen.

Beim Anlegen eines In-App-Kaufs sollte die Produkt-ID wie folgt aussehen.
com.eXODAIOSLIB.stephan.com.Listory.autoRenewSixmonth

also im Format:
com.eXODAIOSLIB.stephan.com.<Group>.<YourChoice>

Die Abo-Laufzeit nicht vergessen! In meinem Beispiel beträgt sie 6 Monate.

Danach muss eine Lokalisierung erstellt werden. Da ich meine Apps üblicherweise international anbiete, ist meine Standardsprache englisch. Dafür wähle ich dann English (USA). Lokalisierungen für weitere Länder erstelle ich erst später, wenn alles erfolgreich durch die Prüfung gelaufen ist.

Ebenso ist eine Lokalisierung für die Abo-Gruppe erforderlich. In eine Abo Gruppe kann man beispielsweise mehrere Autorenewable Angebote legen.

Das Promotional Image muss die Auflösung 1024 x 1024 Pixel haben und sollte kein Screenshot sein sowie die Information über den Kauf enthalten.
Bei dem Screenshot für die Prüfinformation erwartet Apple einen Screenshot, auf dem der Kaufvorgang zu erkennen ist. Das Prüfbild muss die Auflösung 640×920 haben! Es wird im App-Store nicht angezeigt.

Auto-Renewable Subscriptions sind eine besondere Herausforderung. Hier die Regeln mit Bespielen von Apple.

  • Unter Features den In-App Kauf anlegen
  • Dann alle Metadaten für den In-Kauf festlegen
  • Diesen In-App-Kauf in die Prüfung geben!
  • Dann eine neue Binärdatei hochladen.
  • abwarten, bis der In-App Kauf „Warten auf Prüfung“
  • im Status „Warten auf Prüfung“ ist der In-App-Kauf für die Sandbox verfügbar
Übermitteln des In-App Kaufs
Beispiel Erfassungsansicht bearbeiten eines In-App Kaufs
Übermitteln des In-App-Kaufs mit einer neuen Version

Fallstricke:

Das folgende promotional Bild wurde abgelehnt, weil der Text schlecht lesbar ist.

Abgelehntes Bild wegen der schlechten Lesbarkeit

Das nun folgende Bild war dann erfolgreich.

Bei der Prüfung von Apple aktzeptiert

Apple fordert in der App auch einen Link für Terms & Conditions sowie die Privacy Policy. Hier ein Generator für beides.

In Deiner App muss auf die Terms of use und die Privacy Policy verlinkt werden. Zusätlich muss der Standard Apple Vertrag durch die eigenen Terms of use ersetzt werden.

Folgendes Feedback habe ich dazu von Apple bekommen. Das erhält man, wenn man es nicht richtig macht 😉

Guideline 3.1.2 – Business – Payments – Subscriptions

We noticed that your app did not fully meet the terms and conditions for auto-renewing subscriptions, as specified in Schedule 2, section 3.8(b) of the Paid Applications agreement.

When the user initiates an in-app purchase on the App Store, they are taken into your app to continue the transaction. 

However, information about the subscription must be displayed to the user prior to the purchase: 
• Title of publication or service
• Length of subscription (time period and content or services provided during each subscription period)
Price of subscription, and price per unit if appropriate

Your app must include links to your privacy policy and Terms of Use, and users should be able to access these links at any time.

Next Steps

To resolve this issue, please revise your app to include the missing information prior to initiating any auto-renewing subscription purchases within your app.

If you have no future plans on promoting this in-app purchase product, you can visit App Store Connect to delete the associated promotional image. 

To delete the promoted image: 

– Log in to App Store Connect
– Click on „My Apps“
– Select this app
– Click „Features,“ then “App Store Promotions” to view your promoted in-app purchases 
– Click the in-app purchase reference name that you no longer want to promote 
– Select the associated promotional image and delete it 
– Click Save

Resources

To learn more about auto-renewing subscription requirements, please review Schedule 2, section 3.8(b) of the Paid Applications agreement in App Store Connect.

Hello Tobias,

We are writing to let you know the appeal results for your app, Listory Lister Shopping App.

The App Review Board evaluated your app and determined that the original rejection feedback is valid.

We continue to find that your app description to be displayed on the App Store does not currently include a link to your app’s terms of use. 

To resolve this issue, please revise your app description to include a link to your service’s terms of use. 

We encourage you to review the previous rejection correspondence for this app, make the necessary changes to bring it into compliance with the App Store Review Guidelines, and resubmit it for review.

Best regards,

Jan
App Review Board

Das Testen von In-App-Käufen geht durch Anlegen eines Sandbox User-Accounts. Wenn eine Autorenewable Subscription gekauft wird, gelten für die Sandbox folgene verkürzte Laufzeiten:

Actual DurationTest Duration
1 week3 minutes
1 month5 minutes
2 months10 minutes
3 months15 minutes
6 months30 minutes
1 year1 hour
Laufzeiten für die Sandbox-Käufe